Disclaimer: This is not an advertorial!!! I just wanna share my (awesome) methods of removing blackheads & whiteheads!

I HATE BLACKHEADS
I remember that there was an occasion with one of my exes.. we were talking about his ex (or more of I was asking him what his impression was of his ex) and then he used 5 words to describe her:
When I heard him say that, I didn't know whether I should be happy (because I saw the image of a troll in my mind when he said that) or whether I should be worried..
Worried because I know that I do not have a petite nose with a sharp nose bridge (lucky you for those who have!) and that I knew I had inherited my grandfather's jumbu (English fruit name: rose apple) nose.
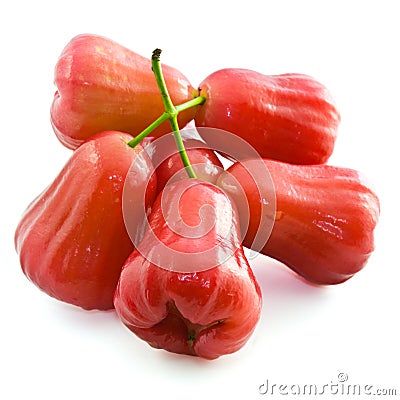
Rose apple
Fortunately, my nose isn't super huge like my grandfather's. And it will only be super huge when it is clogged up with disgusting black heads!
However we all know that... blackheads are not that easy to remove :(
Anyway, one day (while I was still attached with that same ex of mine who described his ex using 5 words) my ex looked at me intently and told me this:
His words speared through my heart. At that moment I wished that I was a turkey and that I could burrow a hole to hide my head in the hole. So embarrassed man WTH
Since then I have been really paranoid about blackheads - mine and other people's.
Whenever I am near enough to observe a person's nose and I see that he/she has a seriously bad blackheads issue, I can't help but to feel conflicted. Conflicted because I was disgusted to seeing that their blackheads is so huge that it is popping out of its pore already and yet they don't remove it, and because I feel empathy for them as I can totally understand the frustration towards removing blackheads. IT IS EASIER SAID THAN DONE.
In my years of removing blackheads (ie. experimenting with different nose strips and peel-off nose mask), I finally found THE FORMULA which guarantees success for me EVERY SINGLE TIME and it is really affordable!
I use...

SKINLITE Nose Pore Cleansing Strips, sold at SASA for $4.90 per box!
They usually run a 2 for 1 promotion! So I would get 3 boxes at one go!
If I have to do one of those top 5 beauty-items-that-you-cannot-live-without list, this would definitely be one of them! (Excluding cosmetics products!!! Because 5 would be too little then!!)
This nose strip is really my saviour! I have used a gazillion brands and types of nose blackheads removal products but none have worked as well as this has! This is really damn damn damn good!
Usually what I do is that I would first wash my face using a facial wash that would soften my facial complexion.
DO NOT pick a facial wash that would tighten up your pores. What you want to do is to soften your facial skin, allow the pores to not be tight, so that when the sticky product gets stuck onto the blackhead, it can be pulled out of the pore easily when you remove the nose strip.
If you do use facial wash that aims to tighten up pores, then do expect the results to not be so good. I tried it before and the results are significantly worst :/
Of all the facial wash(es) that I have used, Himalaya Herbals Gentle Face Wash (Citron & Honey) has proven to be THE ONE for me that has the skin softening effect.

It is one of the affordable face wash which is best at making my skin soft. Before I discovered the awesome nose strips, I would be sitting before a mirror and pry at my nose pores with my 2 index fingers. Because the face wash softened my nose pores, it was really easy to get the blackheads out. Just apply a teeny bit of pressure and out pops the blackhead!
However it was a really tedious process which is really energy and time consuming! I can get tired after 15 minutes of that activity, because so much concentration is needed!
The right amount of energy must be applied or you would break through the surface of your skin and then you have to spend the next 5-7 days walking around school with a nose that is practically shouting at everyone:
Also, because you have to be so precise with your fingers to make sure that you are squeezing the RIGHT PORE, with the RIGHT ANGLE... you have to squint your eyes so much that you would look pretty much like this:

I am so glad that I no longer have to be all squinty-eyes and afraid that if I were to pick at my blackheads tonight, I might have to go out tomorrow with a red nose!
So, wash your face!
Wet your nose! And the sides around your nose!


Apply the nose strip! Wait for about 20-30 minutes...
Or maybe even longer... the point is to make sure that the nose strip is thoroughly 100% dry!!
And when you think it has truly dried up! (Clue: You will feel that it is very very tight around your nose and it would have crinkled up like a dried prune!)
PEEL IT OFF!!! SLOWLY!!!!!!!!
By slowly, I really mean VERY VERY VERY SLOWLY!!!! Like 1mm per second! The slower you are, the more blackheads would be removed!
I like to remove my blackheads from the 2 roundest parts of my nose first..

Bottom-up approach!! (Peel off starting from the bottom most part, in an upward direction!)
Then I move onto the sides of my nose bridge..

Yes I re-used a photo! Haha!! Don't mind me lah huh? While I was writing editing the pictures for this post then I realised that I didn't take enough for illustration purposes! Oops!
Now in a top-down approach! (Peel off from the top-most part, in a downward direction towards the tip of your nose!)
Leave the tip of your nose for the last!

Peel off in a bottom-up approach again! Starting from the bottom-most part, and doing it slowly, remove the strip off your nose completely!
If there is any white residue left on your nose, just wash it off with some water!
It would be good to now wash your face with a pore-tightening facial wash, so as to close up all the open pores and prevent any bacteria from entering the pores and cause inflammation!
I did this a couple of weeks ago and this is my disgusting nose strip (BE WARNED! GROSS IMAGES COMING UP NEXT!!)


*****
Well I have just shared with you my method of removing blackheads on the nose.. but what about blackheads on the other parts of our face? Say, our cheeks?

This is what I use!

SHILLS Acne Purifying peel-off Black Mask
Now don't say that I didn't warn you! When removing this product off your face, it hurts LIKE A BITCH.
This product works. But I feel that it doesn't just remove the blackheads, but it removes my facial hair as well! Tears would gather in my eyes when I am peeling the mask off my face. This is how much it hurts but damn, it really works.
The sacrifices and pain that women go through just to be beautiful. SIGH

I bought this from Blogshop Queenie quite some time ago when she was running a promotion for it. She was selling it for SGD $15.00! Usual price is $20.00.
Maybe you girls can go bug her to run another promotion? #justasuggestion

I really love this product because I never thought that I would find a apply-and-peel-off mask which actually works! It means a lot to me because before I tried out this product, I had absolutely no method at all for removing the blackheads on my cheeks!
Unlike the blackheads on my nose, I couldn't squeeze them out. So I had to just leave them to be.
I did try to apply other brands' peel-off nose mask onto my face so as to remove the blackheads on my cheeks, however the results were as bad as when I applied it on my nose.
There was no effect at all.
I will admit that I was rather hesitant to purchase this product initially because I had tried so many ones before and I got disappointed so many times before.
However I saw videos on YouTube and read so many good reviews that I decided to simply whack it, and just try! I am so glad that I did!
The steps to using this product is really easy. Just like the nose strip, wash your face and dry it!
Then apply this product onto your desired area.

And just wait for it to dry.
Don't be giam siap and put a thin layer, or else it wouldn't work! Don't be too generous either by slathering on too much, if not it will be a super thick layer and will take damn long to dry! Just put a sufficient amount to cover up and make sure that no bit of your skin can be seen!
I played around with the camera a little bit while waiting for the face mask to dry..

Take 1! 
Take 2! 
Take 3! (K Idk what I was doing man but damn this photo is funny! HAHAHA!)
After about 20-30 minutes, I will check on my face and I know it is time to remove when it becomes dry and tight!
When you can feel the difficulty scrunching up your face like this..

You know it's time to remove it!
The face mask will become smooth and reflective!
TIME TO REMOVE NOW!!!!

Direction of removal: Outwards to inwards. Upwards to downwards.
My recommendation is to first watch this video (if you understand Chinese) before trying out this product!
Removing the mask off my face...

Hurts. Like. A. Bitch.
I only removed a tiny portion and my eyes were gonna tear already. The pain shot through my face to my toes. I was scrunching up my toes as I tore the mask away from my face! The pain is about.. 2/5?
It is a bearable pain but just really uncomfortable. Every time when I am removing the face mask, I would swear that I would never put it on again. Ironically... I still do though LOL. Because it works and it makes my face smaller after that!

Yuck!!! So many small whiteheads came out plus one SUPER BIG whitehead!!!

LOL at the amount of face hair that came off!

If there are leftover residue on your face, just rinse it away with lukewarm water. It will come off easily!
Because the product will become really tight against your face, it will make your face smaller after using this product!
I decided to see how much smaller my face became after putting on the face mask.. so I measured!
Before I put on the face mask, I measured one side (right side) of my face from my chin to my ear lobe.. and it was 15cm.
After the face mask..

IT WAS 13CM!!!!
SUPER AMAZING!!! My face was 2cm slimmer!!! No woman in this world would say 'NO!' to a slimmer and smaller face!
Other effects felt after using the product are a smoother and softer facial skin texture, and because the impurities are removed, my face seemed like it is more radiant and glowy?

Ok that's all from me. Kthxbye
I remember that there was an occasion with one of my exes.. we were talking about his ex (or more of I was asking him what his impression was of his ex) and then he used 5 words to describe her:
"She has a big nose."
When I heard him say that, I didn't know whether I should be happy (because I saw the image of a troll in my mind when he said that) or whether I should be worried..
Worried because I know that I do not have a petite nose with a sharp nose bridge (lucky you for those who have!) and that I knew I had inherited my grandfather's jumbu (English fruit name: rose apple) nose.
Fortunately, my nose isn't super huge like my grandfather's. And it will only be super huge when it is clogged up with disgusting black heads!
However we all know that... blackheads are not that easy to remove :(
Anyway, one day (while I was still attached with that same ex of mine who described his ex using 5 words) my ex looked at me intently and told me this:
"You know.. the blackheads on your nose are really disgusting. Can you do something about it?"
His words speared through my heart. At that moment I wished that I was a turkey and that I could burrow a hole to hide my head in the hole. So embarrassed man WTH
Since then I have been really paranoid about blackheads - mine and other people's.
Whenever I am near enough to observe a person's nose and I see that he/she has a seriously bad blackheads issue, I can't help but to feel conflicted. Conflicted because I was disgusted to seeing that their blackheads is so huge that it is popping out of its pore already and yet they don't remove it, and because I feel empathy for them as I can totally understand the frustration towards removing blackheads. IT IS EASIER SAID THAN DONE.
In my years of removing blackheads (ie. experimenting with different nose strips and peel-off nose mask), I finally found THE FORMULA which guarantees success for me EVERY SINGLE TIME and it is really affordable!
I use...
They usually run a 2 for 1 promotion! So I would get 3 boxes at one go!
If I have to do one of those top 5 beauty-items-that-you-cannot-live-without list, this would definitely be one of them! (Excluding cosmetics products!!! Because 5 would be too little then!!)
This nose strip is really my saviour! I have used a gazillion brands and types of nose blackheads removal products but none have worked as well as this has! This is really damn damn damn good!
Usually what I do is that I would first wash my face using a facial wash that would soften my facial complexion.
DO NOT pick a facial wash that would tighten up your pores. What you want to do is to soften your facial skin, allow the pores to not be tight, so that when the sticky product gets stuck onto the blackhead, it can be pulled out of the pore easily when you remove the nose strip.
If you do use facial wash that aims to tighten up pores, then do expect the results to not be so good. I tried it before and the results are significantly worst :/
Of all the facial wash(es) that I have used, Himalaya Herbals Gentle Face Wash (Citron & Honey) has proven to be THE ONE for me that has the skin softening effect.
It is one of the affordable face wash which is best at making my skin soft. Before I discovered the awesome nose strips, I would be sitting before a mirror and pry at my nose pores with my 2 index fingers. Because the face wash softened my nose pores, it was really easy to get the blackheads out. Just apply a teeny bit of pressure and out pops the blackhead!
However it was a really tedious process which is really energy and time consuming! I can get tired after 15 minutes of that activity, because so much concentration is needed!
The right amount of energy must be applied or you would break through the surface of your skin and then you have to spend the next 5-7 days walking around school with a nose that is practically shouting at everyone:
"Hey! My owner was picking on the blackheads on me and accidentally used too much force, and that is why I have a blood clot on me now and I look so red and inflamed!"
Also, because you have to be so precise with your fingers to make sure that you are squeezing the RIGHT PORE, with the RIGHT ANGLE... you have to squint your eyes so much that you would look pretty much like this:
I am so glad that I no longer have to be all squinty-eyes and afraid that if I were to pick at my blackheads tonight, I might have to go out tomorrow with a red nose!
So, wash your face!
Wet your nose! And the sides around your nose!
Apply the nose strip! Wait for about 20-30 minutes...
Or maybe even longer... the point is to make sure that the nose strip is thoroughly 100% dry!!
And when you think it has truly dried up! (Clue: You will feel that it is very very tight around your nose and it would have crinkled up like a dried prune!)
PEEL IT OFF!!! SLOWLY!!!!!!!!
By slowly, I really mean VERY VERY VERY SLOWLY!!!! Like 1mm per second! The slower you are, the more blackheads would be removed!
I like to remove my blackheads from the 2 roundest parts of my nose first..
Bottom-up approach!! (Peel off starting from the bottom most part, in an upward direction!)
Then I move onto the sides of my nose bridge..
Now in a top-down approach! (Peel off from the top-most part, in a downward direction towards the tip of your nose!)
Leave the tip of your nose for the last!
Peel off in a bottom-up approach again! Starting from the bottom-most part, and doing it slowly, remove the strip off your nose completely!
If there is any white residue left on your nose, just wash it off with some water!
It would be good to now wash your face with a pore-tightening facial wash, so as to close up all the open pores and prevent any bacteria from entering the pores and cause inflammation!
I did this a couple of weeks ago and this is my disgusting nose strip (BE WARNED! GROSS IMAGES COMING UP NEXT!!)
Well I have just shared with you my method of removing blackheads on the nose.. but what about blackheads on the other parts of our face? Say, our cheeks?
This is what I use!
Now don't say that I didn't warn you! When removing this product off your face, it hurts LIKE A BITCH.
This product works. But I feel that it doesn't just remove the blackheads, but it removes my facial hair as well! Tears would gather in my eyes when I am peeling the mask off my face. This is how much it hurts but damn, it really works.
The sacrifices and pain that women go through just to be beautiful. SIGH
I bought this from Blogshop Queenie quite some time ago when she was running a promotion for it. She was selling it for SGD $15.00! Usual price is $20.00.
Maybe you girls can go bug her to run another promotion? #justasuggestion
I really love this product because I never thought that I would find a apply-and-peel-off mask which actually works! It means a lot to me because before I tried out this product, I had absolutely no method at all for removing the blackheads on my cheeks!
Unlike the blackheads on my nose, I couldn't squeeze them out. So I had to just leave them to be.
I did try to apply other brands' peel-off nose mask onto my face so as to remove the blackheads on my cheeks, however the results were as bad as when I applied it on my nose.
I will admit that I was rather hesitant to purchase this product initially because I had tried so many ones before and I got disappointed so many times before.
However I saw videos on YouTube and read so many good reviews that I decided to simply whack it, and just try! I am so glad that I did!
The steps to using this product is really easy. Just like the nose strip, wash your face and dry it!
Then apply this product onto your desired area.
And just wait for it to dry.
Don't be giam siap and put a thin layer, or else it wouldn't work! Don't be too generous either by slathering on too much, if not it will be a super thick layer and will take damn long to dry! Just put a sufficient amount to cover up and make sure that no bit of your skin can be seen!
I played around with the camera a little bit while waiting for the face mask to dry..
After about 20-30 minutes, I will check on my face and I know it is time to remove when it becomes dry and tight!
When you can feel the difficulty scrunching up your face like this..
The face mask will become smooth and reflective!
TIME TO REMOVE NOW!!!!
My recommendation is to first watch this video (if you understand Chinese) before trying out this product!
Removing the mask off my face...
I only removed a tiny portion and my eyes were gonna tear already. The pain shot through my face to my toes. I was scrunching up my toes as I tore the mask away from my face! The pain is about.. 2/5?
It is a bearable pain but just really uncomfortable. Every time when I am removing the face mask, I would swear that I would never put it on again. Ironically... I still do though LOL. Because it works and it makes my face smaller after that!
Because the product will become really tight against your face, it will make your face smaller after using this product!
I decided to see how much smaller my face became after putting on the face mask.. so I measured!
Before I put on the face mask, I measured one side (right side) of my face from my chin to my ear lobe.. and it was 15cm.
After the face mask..
SUPER AMAZING!!! My face was 2cm slimmer!!! No woman in this world would say 'NO!' to a slimmer and smaller face!
Other effects felt after using the product are a smoother and softer facial skin texture, and because the impurities are removed, my face seemed like it is more radiant and glowy?
Ok that's all from me. Kthxbye